How To Simulate Ten Zombies in Unreal: Rapid Prototyping and Diverse Crowd Animation using Avatar
The lion’s share of character animation expenses are difficult for end-users to apprehend; keyframe animating, mocap filming, prototyping, and adding non-repetitive, lifelike touches are all pricey and time consuming processes.

The lion’s share of character animation expenses are difficult for end-users to apprehend; keyframe animating, mocap filming, prototyping, and adding non-repetitive, lifelike touches are all pricey and time-consuming processes. Most 3D characters in games and films represent thousands of dollars in time, talent, and tools. (For indie developers and animators, this often means that achieving top-tier animations is primarily a labor of love.) And while existing procedural animation methods help reduce 3D animation costs considerably, they are not sufficient for simulating high fidelity, full-body locomotion.
Crowd simulation is also a multi-layered problem for animators: from creating masses of individualistic agents efficiently, to programming higher level systems for crowd dynamics. For gamers and VR developers, these problems intensify; as Mankyu Sung, Michael Gleicher, and Stephen Chenney predicted in their paper Scalable behaviors for crowd simulation, “natural looking animations become even more important in immersive applications where a real participant can interact in real-time with characters in a virtual environment.” VR users want to be in a world with other actors, and they want these actors to feel real: to react to their decisions, and be diverse and convincing in their styles of movement.
DeepMotion Avatar provides a scalable solution for creating a multitude of realistic, interactive agents. Our pipeline allows developers to author physically simulated characters with speed, all whilst maintaining variation and quality in the final character animations. Integrating Avatar into your workflow will reduce the cost and time of rapid prototyping, injecting character movements with unexpected details, or simulating diverse crowds. We hope this article will help readers produce cost-efficient animations, and eventually provide an alternative to live-action crowd simulation altogether (using actors for your crowd is, after all, incredibly involved).
For this piece we’ve picked a crowd-prone creature that one of our alpha testers needed to animate more efficiently: Zombies! We’ll start by using the DeepMotion Avatar pipeline to author a physically simulated, self-walking zombie, test it in our Unreal Engine environment, and alter the zombie’s movement style using Avatar livesync. We’ll then go through the process of spawning additional zombie animations and simulating a small crowd of distinctive, self-walking zombies.
Steps
1: Prepare your Zombie Rig for Configuration
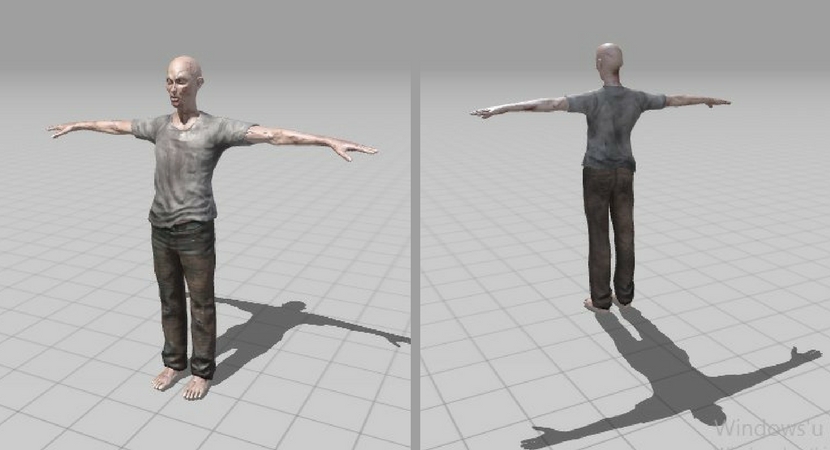
Prior to importing your FBX character file into the DeepMotion Avatar pipeline, make sure it is in T-pose. We recommend creating a “light version” of your FBX file for configuration purposes, as there is a 15MB Avatar export limit. Higher resolution skeletal meshes can be implemented in your game environment after configuration. We used this free zombie model for our demo.
2: Creating a DeepMotion Avatar Project
Sign in to the DeepMotion Avatar portal and select “Start SimRig Editor”. Once in the SimRig editor, select “Create Project” and import your FBX character file.
3: Configuring Your Character Skeleton
Using your mouse to drag and drop, assign each bone from the simulation rig to the corresponding bone on your character. The simulation rig should be entirely gray once all the bones have been assigned. Some of your character’s bones may remain unassigned.
4. Adjust Character Colliders
Open the “Colliders” tab in the “Bone Attributes” window and select “Autosize All”. Adjust the colliders individually as needed to match your skeleton (W key - Move, E key - Rotate, R key - Scale). Colliders should be kept slightly inside the boundaries of your mesh.
5. Modify Bones
We wanted our Zombie’s walk to exhibit the effects of deteriorated flesh and joints, so we loosened its head and arm bones to impair muscle control. We’ll do this by lowering the “kp” (force of muscles) and “kd” (dampening) fields under the “Bone” tab, as well as modifying the “moi” to lower the bones’ resistance to motion.
6: Export Your Character
Once the character is ready for testing export an AVT file.
7: Unreal Integration
Follow instructions provided in our documentation for Unreal integration and deployment to install DeepMotion Avatar, create your new project, and enable the DeepMotion plugin for UE4.
8: Creating Your Scene
Once the DeepMotion Avatar plugin has properly been installed in Unreal, you can duplicate one of the scenes from the DeepMotion Avatar Package or begin working within your own scene. Be sure to add this Actor Locomotion Blueprint (ALB) to your scene during this step, the ALB will act as a template for our Zombie asset.
9: Changing Your Character Skeletal Mesh
If you used a light version of your character for configuration, you can now add a high resolution mesh to your character. Drop the desired FBX file into your Content Browser. Under “Actor Locomotion Blueprint”, select “PoseableMesh”. Drag your newly added Skeletal Mesh into the Deep Motion Avatar “Skeletal Mesh” field.
10: Import Your DeepMotion Zombie Asset
Select “Add New” from the Content Browser. Hover over “DeepMotion” and select “DeepMotion Avatar Asset”. Assign the AVT file authored from the DeepMotion pipeline to this new asset.
11: Assign DeepMotion Asset to Your Character
Under “Actor Locomotion Blueprint”, select “DeepMotionAvatarCharacter”. Drag your newly created DeepMotion Avatar Asset into the “Deep Motion Avatar Character” field.
12: Enable Livesync Between DeepMotion Avatar and Unreal Engine
Select “Livesync” in the “Deep Motion Avatar Character” field.
13: Test Your Character Simulation
Press play to test your Zombie in action. Use your the 8,4,6,2 keys on your numpad to move the zombie through the scene. If you come across issues or want to view the character without a mesh, checking “Draw Debug” can help you troubleshoot issues by displaying the colliders.

14: Adjust Your Character Parameters
Go back to the DeepMotion Avatar Pipeline and select “Global Controller” from the “Bone Attributes” panel. From here you’ll be able to drop down “Control Parameters” and start experimenting with your character’s movement style. Click the “Livesync” button on the main menu once you are ready to test your changes.
15: Test and Iterate
Test your adjustments by pressing Play in Unreal and watching your character move through the scene. Repeat steps 12 and 13 until you’re satisfied with your Zombie’s bone positioning, bone dampening and force, as well as your character’s movement control parameters. Take your time to test and learn the effects of adjusting different parameters. An overview of bone attributes and control parameters can be reviewed here.
16: Duplicate and Modify Your Zombie Character
Once satisfied with your first physics simulated Zombie there are two ways to create the remaining 9 zombies: A) create a new DeepMotion Avatar project in your SimRigEditor and repeat steps 1-12, or, B) export a new AVT file for each Zombie from the original DeepMotion project, adjusting control parameters along the way. For method B, please note: AVT files cannot be re-imported into your SimRig Editor, so you will not be able to revert to older versions or modify earlier Zombie AVTs. Regardless of which method you choose, be sure to turn off LiveSync on the prior zombies in Unreal, otherwise all your Zombies will be synced to modifications made in the SimRig Editor.
17: Add Zombies to Your Scene
Duplicate an Actor Locomotion Blueprint in your Content Browser for each zombie and add them to your scene. Be sure to create a unique DeepMotion Avatar Asset containing the desired AVT file (even if you using the same AVT file for multiple characters)
(Zombie Attack Demo by DeepMotion Physics Engineer, Tom Mirades. This Demo uses the same AVT files discussed in this post, but was made in Unity. The environment can be found here.)
DeepMotion is working on core technology to transform traditional animation into intelligent simulation. Through articulated physics and machine learning, we help developers build lifelike, interactive, virtual characters and machinery. Many game industry veterans remember the days when NaturalMotion procedural animation used in Grand Theft Auto was a breakthrough from IK-based animation; we are using deep reinforcement learning to do even more than was possible before. We are creating cost-effective solutions beyond keyframe animation, motion capture, and inverse kinematics to build a next-gen motion intelligence for engineers working in VR, AR, robotics, machine learning, gaming, animation, and film. Interested in the future of interactive virtual actors? Learn more here or sign up for our newsletter.