Animate 3D: Custom Characters FAQ
Animate 3D allows you to upload a custom 3D character directly to the cloud for you to preview your animations on, then download them retargeted onto your character in an .FBX or .BVH format, or in a ready-to-view .MP4 format.

Animate 3D allows you to upload a custom 3D character directly to the cloud for you to preview your animations on, then download them retargeted onto your character in an .FBX, .BVH, .GLB or in a ready-to-view .MP4 format.
If you're looking for Face Tracking, please check out our Face Tracking FAQ here.
How do I know what 3D character to use?
3D characters come in all shapes and sizes. To have a successful output, you need the following:
- Rigged 3D Character - A rigged 3D character has a skeleton that you’re able to retarget your animation to, versus a 3D character that has just mesh. (See specifics on rig setup below)
- Humanoid - We can only capture human motion at this time, so need humanoid characters to match the animation.
- .FBX & .GLB File Types - We currently only support these type of 3D file upload at this time.
Where can I find 3D characters?
We have partnered with Wolf3D, enabling the creation of custom avatars directly within Animate 3D. Using the Ready Player Me avatar generator, you can create your own character, which then gets saved directly to your account, ready for animation! Check out our walkthrough for how to use this feature.
Check out these other 3D model websites to find additional characters to use with your animations:
What is animation retargeting?
Being able to upload a custom character enables you to assign your animation to a character of your choice. “Retargeting” refers to assigning the joints of the animation to the joints of your character.
Why does uploading a Custom Character matter?
Game engines like Unity and Unreal have their own auto-mapping algorithms to help the process of retargeting. However, software like Blender doesn’t have an easy way to do this. If the result has already been retargeted to the custom character, the animation can be directly used on the character, in 3D software. This saves time for both situations.
Additionally, if you’re interested in just the .MP4 video output, this enables you to have characters of your choosing without needing to download the animation files and edit them.
NOTE: The below settings are for advanced users who want to edit or create their own character rigs.
How should my character be rigged?
If the humanoid model you’re using is not rigged correctly for Animate 3D, you will typically get a detailed error telling you what the specific issue is that needs to be fixed.
Below is a detailed description of the proper rig setup that works best with Animate 3D:
General
The cleaner the file, the better. It is better to include only the needed character mesh and rigging information in the uploaded .FBX or .GLB file, without extra information such as animations and environment models.
Character
- Only one character in the upload file.
Pose
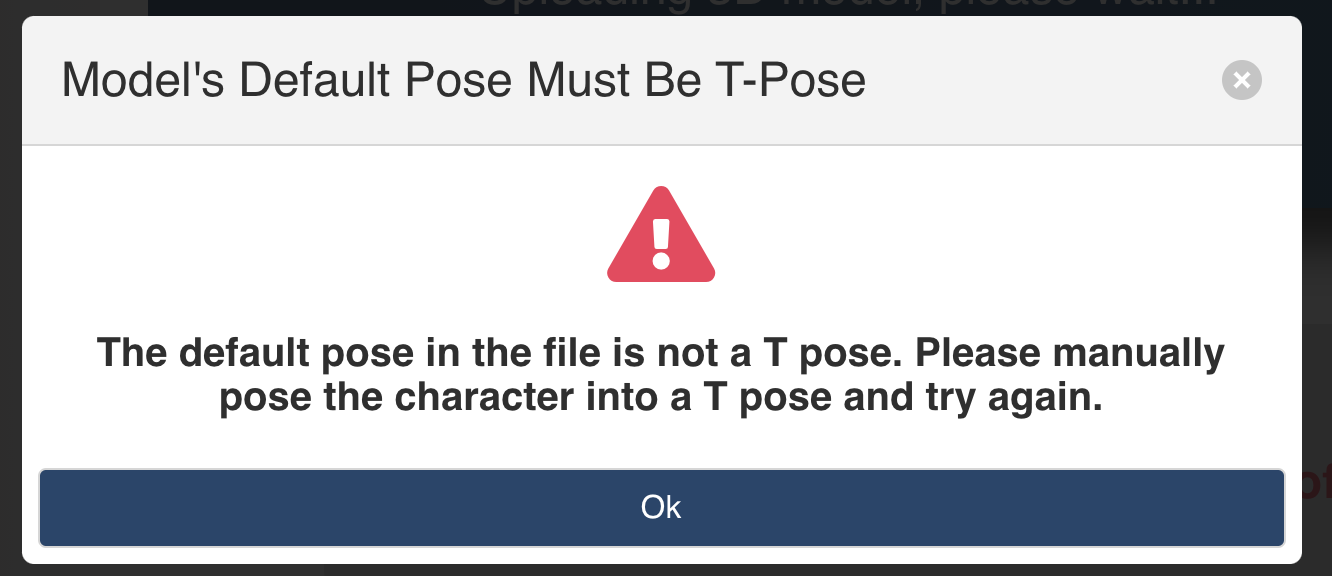
- The model should be positioned in a T-pose when you export your model, i.e. the model’s default pose is a T pose.
- The feet of the character needs to be put on the origin plane.
Joint Names
- Make sure the joint names are all unique.
- Make sure no space is in the names. This is very important.
Rotation Order
- We recommend using XYZ for your joint rotation order. The joints not with the XYZ rotation order will be converted to XYZ.
Joint Scale
- Please avoid using scale on the joints. If you need to scale up the whole skeleton, please apply it at a root node.
Size
- The model should be scaled correctly in human proportion. The height should be around 1.7m (5’6”) tall.
Rig Hierarchy
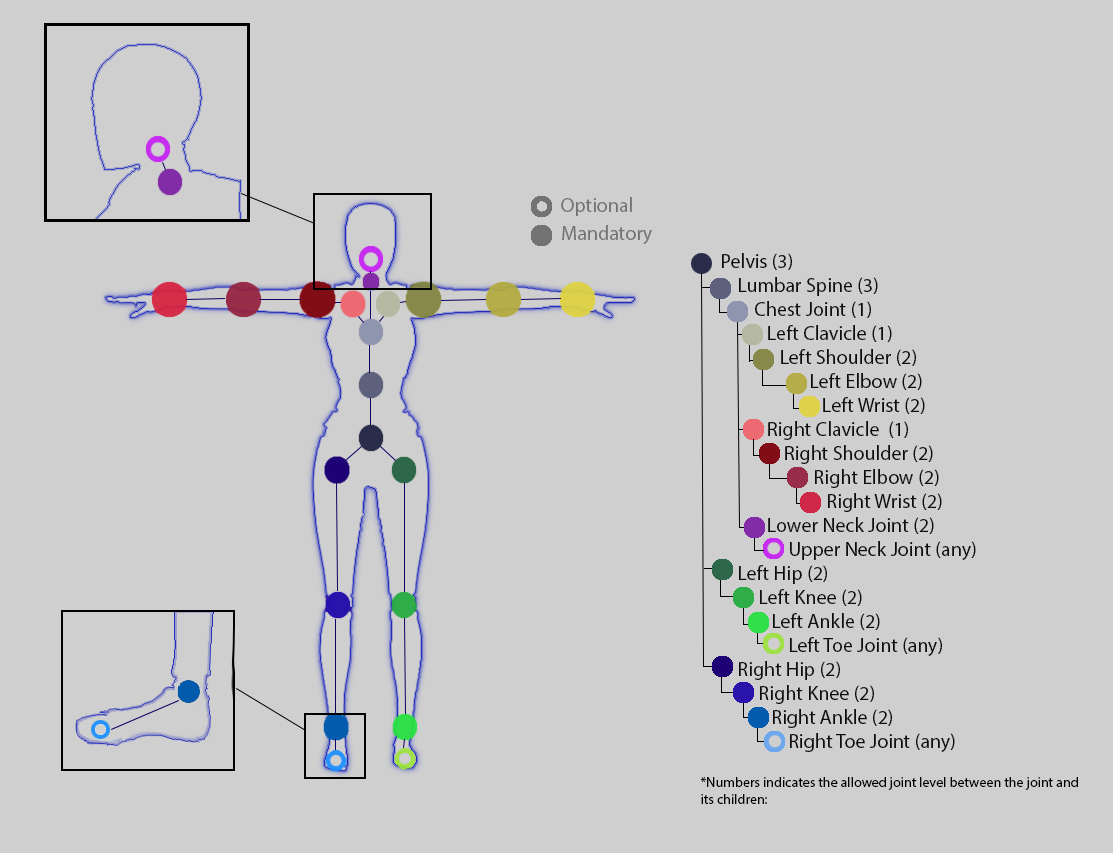
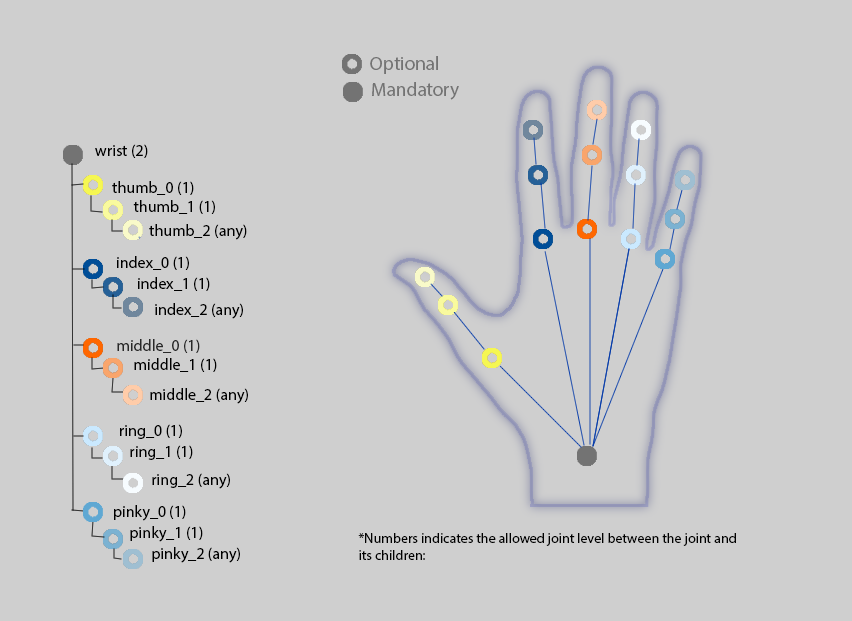
NOTE: The model should include all the required joints in the following hierarchy, not necessarily the same name.
- The cleaner the rig hierarchy, the better.
- We only support models with one root joint. For example, the following hierarchy will not work:

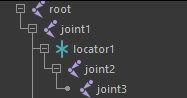
- If the skin is bound to nodes that are not joint type (e.g. Maya locators), the node will be skipped in the processing and will cause problems. Thus please don’t have non-joint type nodes in the middle of the hierarchy.
E.g. the following may generate the wrong result
E.g. the following should work fine

- The model should include all the required joints in the following hierarchy, not necessarily the same name. The number indicates the allowed joint level between the joint and its children:
- The numbers next to the joint names indicate the allowed joint level between the joint itself and its children, e.g. Left Hip(2). As an example, the 2 next to the Left Hip means its child, Left Knee, can be one or two levels down the hierarchy.